
Want to learn how to webcast?
This article discusses, briefly, what is a webcast before explaining how to do a webcast of your own in five steps. If you want a video on this topic, along with highlighting many of the features that could be used as part of a webcast or resulting on-demand file, check out this Getting Started Demo.
- What is a webcast?
- What is the difference between a webcast and a webinar?
- Step 1: select a video and audio source
- Step 2: picking an encoder
- Step 3: choosing a delivery method
- Step 4: securing an Internet connection
- Step 5: configuring your encoder
What is a webcast?
Before diving into the “how”, let’s briefly tackle the “what”. For those who have heard of a webcast but are unfamiliar with exactly what it means or how it differs from a live stream, just know that’s live online video. Essentially, a webcast is broadcasting live video over the Internet. It’s not tied to formats, compatible devices or anything else. If someone is doing a live stream and it’s done over the Internet, it’s a webcast.
What is the difference between a webcast and a webinar?
A webinar is a type of webcast. By definition, a webinar is an online seminar or web conference done over the Internet in real-time. Often times an interactive component, like a Q&A session, is included but is not mandatory. The format is known as an educational platform to provide information on a subject. Since it’s video streamed over the Internet, it is a type of webcast. In other words, all webinars are webcasts, but not all webcasts are webinars. For those wondering how a webcast differs from a podcast, webcast usually relates to video content while a podcast will relate to an audio broadcast, sometimes live but often on-demand as well.
Now that we have talked about what is a webcast, let’s dive into the steps for how to webcast.
Step 1: select a video and audio source
This steps might be quick, if you have done video in the past and have access to equipment, or might be time consuming if you have never streamed before. If you are new to streaming, selecting a video source should be something that can be digitized. This will either be a webcam, which already produces a video signal in a web friendly format, or it will involve using a camera and a capture card that will create a source that is web friendly. Cameras that have outputs such as HDMI, HD-SDI or component are examples of ones that will need a capture card. Depending on complexity, the broadcast might use a single video source, or multiple video sources that are switched between.
For audio, this can be a source that is built into the camera, or a separate audio capturing device like an isolated microphone. For those looking for ease of use to do their webcast, a webcam with a built-in mic is the easiest method. Those looking for better results will want a professional camera and an isolated microphone that can be optimally positioned.
Step 2: picking an encoder
For those new to webcasting, an encoder converts your audio-video content into a format that can be streamed over the Internet. The encoder can be software or hardware based. In either scenario, the video and audio sources will be fed into it. The encoder will then broadcast to a stream URL, which will be tied to your delivery method.
In terms of what encoder to use, this will be partially determined by your delivery method. In particular, your encoder should be able to output in a compatible format. For example if your video solution only accepts RTMP (Real Time Messaging Protocol), then your encoder would need to support this. In the case of IBM’s video streaming and enterprise video streaming offerings, an RTMP encoder is needed. Examples include:
- Telestream Wirecast (software)
- vMix (software)
- Teradek Cube (hardware)
- NewTek Tricaster (hadware)
Step 3: choosing a delivery method
For selecting a delivery method this should line up with your goals for the content. If the webcast needs to be secured, then a provider that can restrict access to the content should be picked. This is especially true if the webcast has to be internal only, for which there are Enterprise Video Security Components available to achieve this.
So desired security is one consideration, another is scalability. If your viewership is expected to be potentially large, your delivery method needs to be able to scale accordingly. This white paper, Live Video Delivery System Built for Scalability, outlines a bit about how a system can be built to achieve scale, in particular how it’s done at IBM Watson Media.

Many solutions have value adds that go beyond security and scalability, though. From rudimentary requirements, like an embeddable player, to sophisticated processes like viewer tracking. A content owner will have to prioritize features and choose what to add in-house versus selecting a delivery provider that packages these with the service. One consideration to make, though, is the type of audience you want to reach. Encoders that are RTMP based will only be able to reach viewers that have a Flash based player with the raw feed. That will exclude mobile viewers, where Flash is generally not compatible. A way to reach this audience is through transcoding. This can make the stream compatible over these devices. However, compatibility is one component, the other is making sure the viewer can watch the content with their connection speed. This can be achieved through adaptive bitrate streaming, a process of serving different bitrate and resolution combinations of video content based on their connection speed. This technology is a component of mobile friendly delivery technology today, such as HLS (HTTP Live Streaming). So often when content is converted to be mobile compatible, supporting adaptive streaming can go along with it. That said, the adaptive technology needs the additional bitrates to switch to. There are two methods to achieve this, one is to send the multiple bitrates from the encoder. This isn’t recommended as it requires a faster Internet connection, which will be addressed in the next step. Instead, it’s recommended to go with a service that does cloud transcoding from a single, high quality stream. Essentially creating the additional resolution and bitrate combinations that will be used as part of the adaptive process rather than having to send them.
Step 4: securing an Internet connection
This could be argued as the most important step. A reliable, fast Internet connection is needed to pull off a webcast. How fast of a connection you will need is determined partially by the quality you plan to broadcast at. A good rule of thumb is to secure an upload speed that is about double your planned bitrate. So if you are going to stream at 1Mbps, your upload speed should be 2Mbps.
It should be stressed that the connection to the Internet is crucial. It can make or break a webcast. As a result, a lot of testing should happen at the site of the webcast to ensure there is a reliable connection. This should be done through a speed test at the site. Not of variables too, such as if it’s a shared connection and the possibility of others using the available upload speed during the broadcast if it is. Another consideration is type, as wireless signals are less reliable than a wired connection.
Note that if you go with a service that requires that you send additional bitrates through the encoder, that will require a faster connection speed. How fast again is based on the quality, although in this case all of the bitrates would need to be added up. For example, if one was going to provide a 2.5Mbps, 1Mbps, 500kbps and a 250kbps feed, that would be a total of 3.25Mbps. As a result, a 6.5Mbps upload speed would be required. This is why cloud transcoding to create the additional bitrates on live content is recommended.
Step 5: configuring your encoder
The final piece in the puzzle is configuring your encoder. Your delivery method and connection speed influence this step.
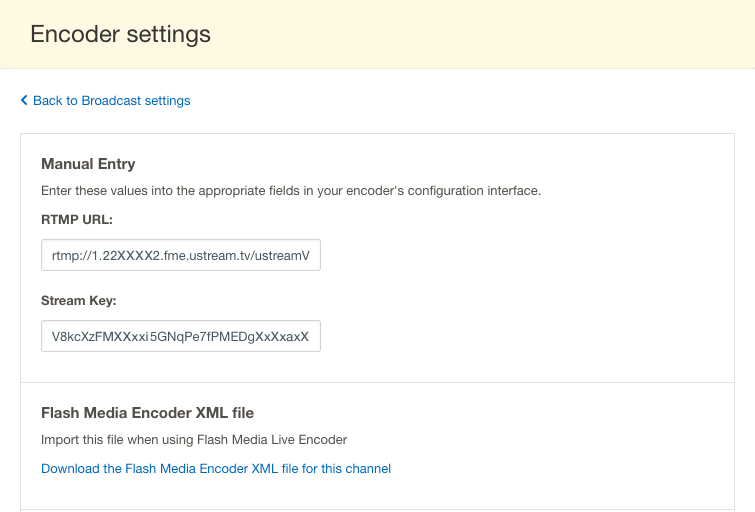 First up is getting inputting the stream URL for the live channel you want to stream to. This will vary depending on your provider. For IBM’s video streaming and enterprise video streaming offerings, this information is found in the dashboard. Clicking on a channel in there and going to “Broadcast Settings” and then “Encoder Settings”. This will give an RTMP URL and a stream Key that can be entered into the encoder. Alternatively, if your encoder supports it, you can login using a device password instead of using the stream details found under “Encoder Settings”.
Next up, inside the encoder you will need to specify your resolution and bitrate. Sometimes these attributes are linked, meaning if you select a 720p option it might have a default bitrate already associated with it. Make sure that the bitrate does not exceed half of your upload speed at the location.
Additional settings will depend on the encoder. If it allows the content owner to manage the keyframe interval, this should be set at 2 seconds. If you don’t see the option to set the interval, this usually means it’s set at 2 seconds. If an auto keyframe interval is available, it should be disabled. Learn more in this Keyframes, Interframe and Video Compression article.
Summary
Webcasting can be easy to pull off, but hard to master. Like most things, practice makes perfect, and doing more broadcasts will allow one to hone their skills. Some of this, like choosing a delivery method, will ideally be a one and done, while things like your Internet connection should be on a venue checklist before every live stream. If you have done your first webcast and are interested in learning more techniques, check out our 5 Pro Tips for Live Video Production.