Have you ever seen video content that looks like the image above, but weren’t sure of the cause? These overt horizontal lines, appearing as pixelation around movement like out of an old school Atari game, are an artifact created from presenting an interlaced source in a progressive format.
This article explains what is interlaced video content and which sources, such as analogue cameras, can produce this type of video content on a live streaming platform. It then goes over deinterlacing techniques to remove this artifact and how to easily enable it on the encoder side… and why you wouldn’t want to use deinterlacing on content that is already progressive.
- What is interlaced video?
- Progressive video and how it differs from interlaced video
- Which method is better: progressive or interlacing?
- What it looks like: interlaced content as progressive video
- How to tell if your camera captures interlaced video
- What is deinterlacing video: when you have to use interlaced sources
- How to deinterlace video for live streaming
- Another source of interlaced video: three-two pull down
- Reverse telecine: removing the 3:2 pull down
- Can deinterlacing video be bad?
What is interlaced video?
Interlaced video is a technique that was originally created and made popular before the advent of digital televised content. First developed over 70 years ago, it was primarily for television video formats like NTSC and PAL.
At its root, interlacing was an early form of video compression that was used to make the video look smoother while sending less data. This was achieved through breaking up each full frame of video into alternating lines taken from two separate fields that were captured at slightly different times. After this process, one set of lines would be delivered to the viewer before 1/60th of a second later the second set of lines would be sent.
In contrast to other possible methods of the time, this process granted what appeared to be smooth movement, at least to the human eye, while being able to send less data related to the broadcast. Interlacing can cause issues, though, trying to deliver that feed to a progressive source due to the differences in presentation between the two.
Progressive video and how it differs from interlaced video
Unlike interlaced content, progressive video is a video track that consists of complete frames. There is a slight asterix to this statement as techniques like interframe can be used to compress video content to remove redundancies from frame to frame (read more about the interframe process). Even including this technique, progressive video content will not alternate fields and will present a full keyframe that you will never find in interlaced content. This means it won’t serve odd or even lines at different time intervals from each other.
Consumers will be familiar with this terminology due to its proliferation in HD content. For example, 1080p content means it has a vertical resolution of 1080 lines while the “p” relates that this is progressive content.
Which method is better: progressive or interlacing?
To be blunt, the answer is it actually doesn’t matter which is better. Many playback methods, like computer monitors or modern HD TVs, do not support interlacing. So even if interlacing provided better looking content, a broadcaster would still want to go with progressive delivery due to support for this method. Otherwise, the broadcaster would be displaying interlaced video in a progressive format.
Assuming both methods were supported equally, the human eye can’t keep up and the motion should look smooth regardless.
What it looks like: interlaced content as progressive video
Sometimes a broadcaster needs to use an interlaced source for streaming. In other words, taking an interlaced source and make it progressive or watching it in a progressive medium, like a computer monitor. This need can range from wanting to use an older broadcast to using an analogue camera that supports interlacing.
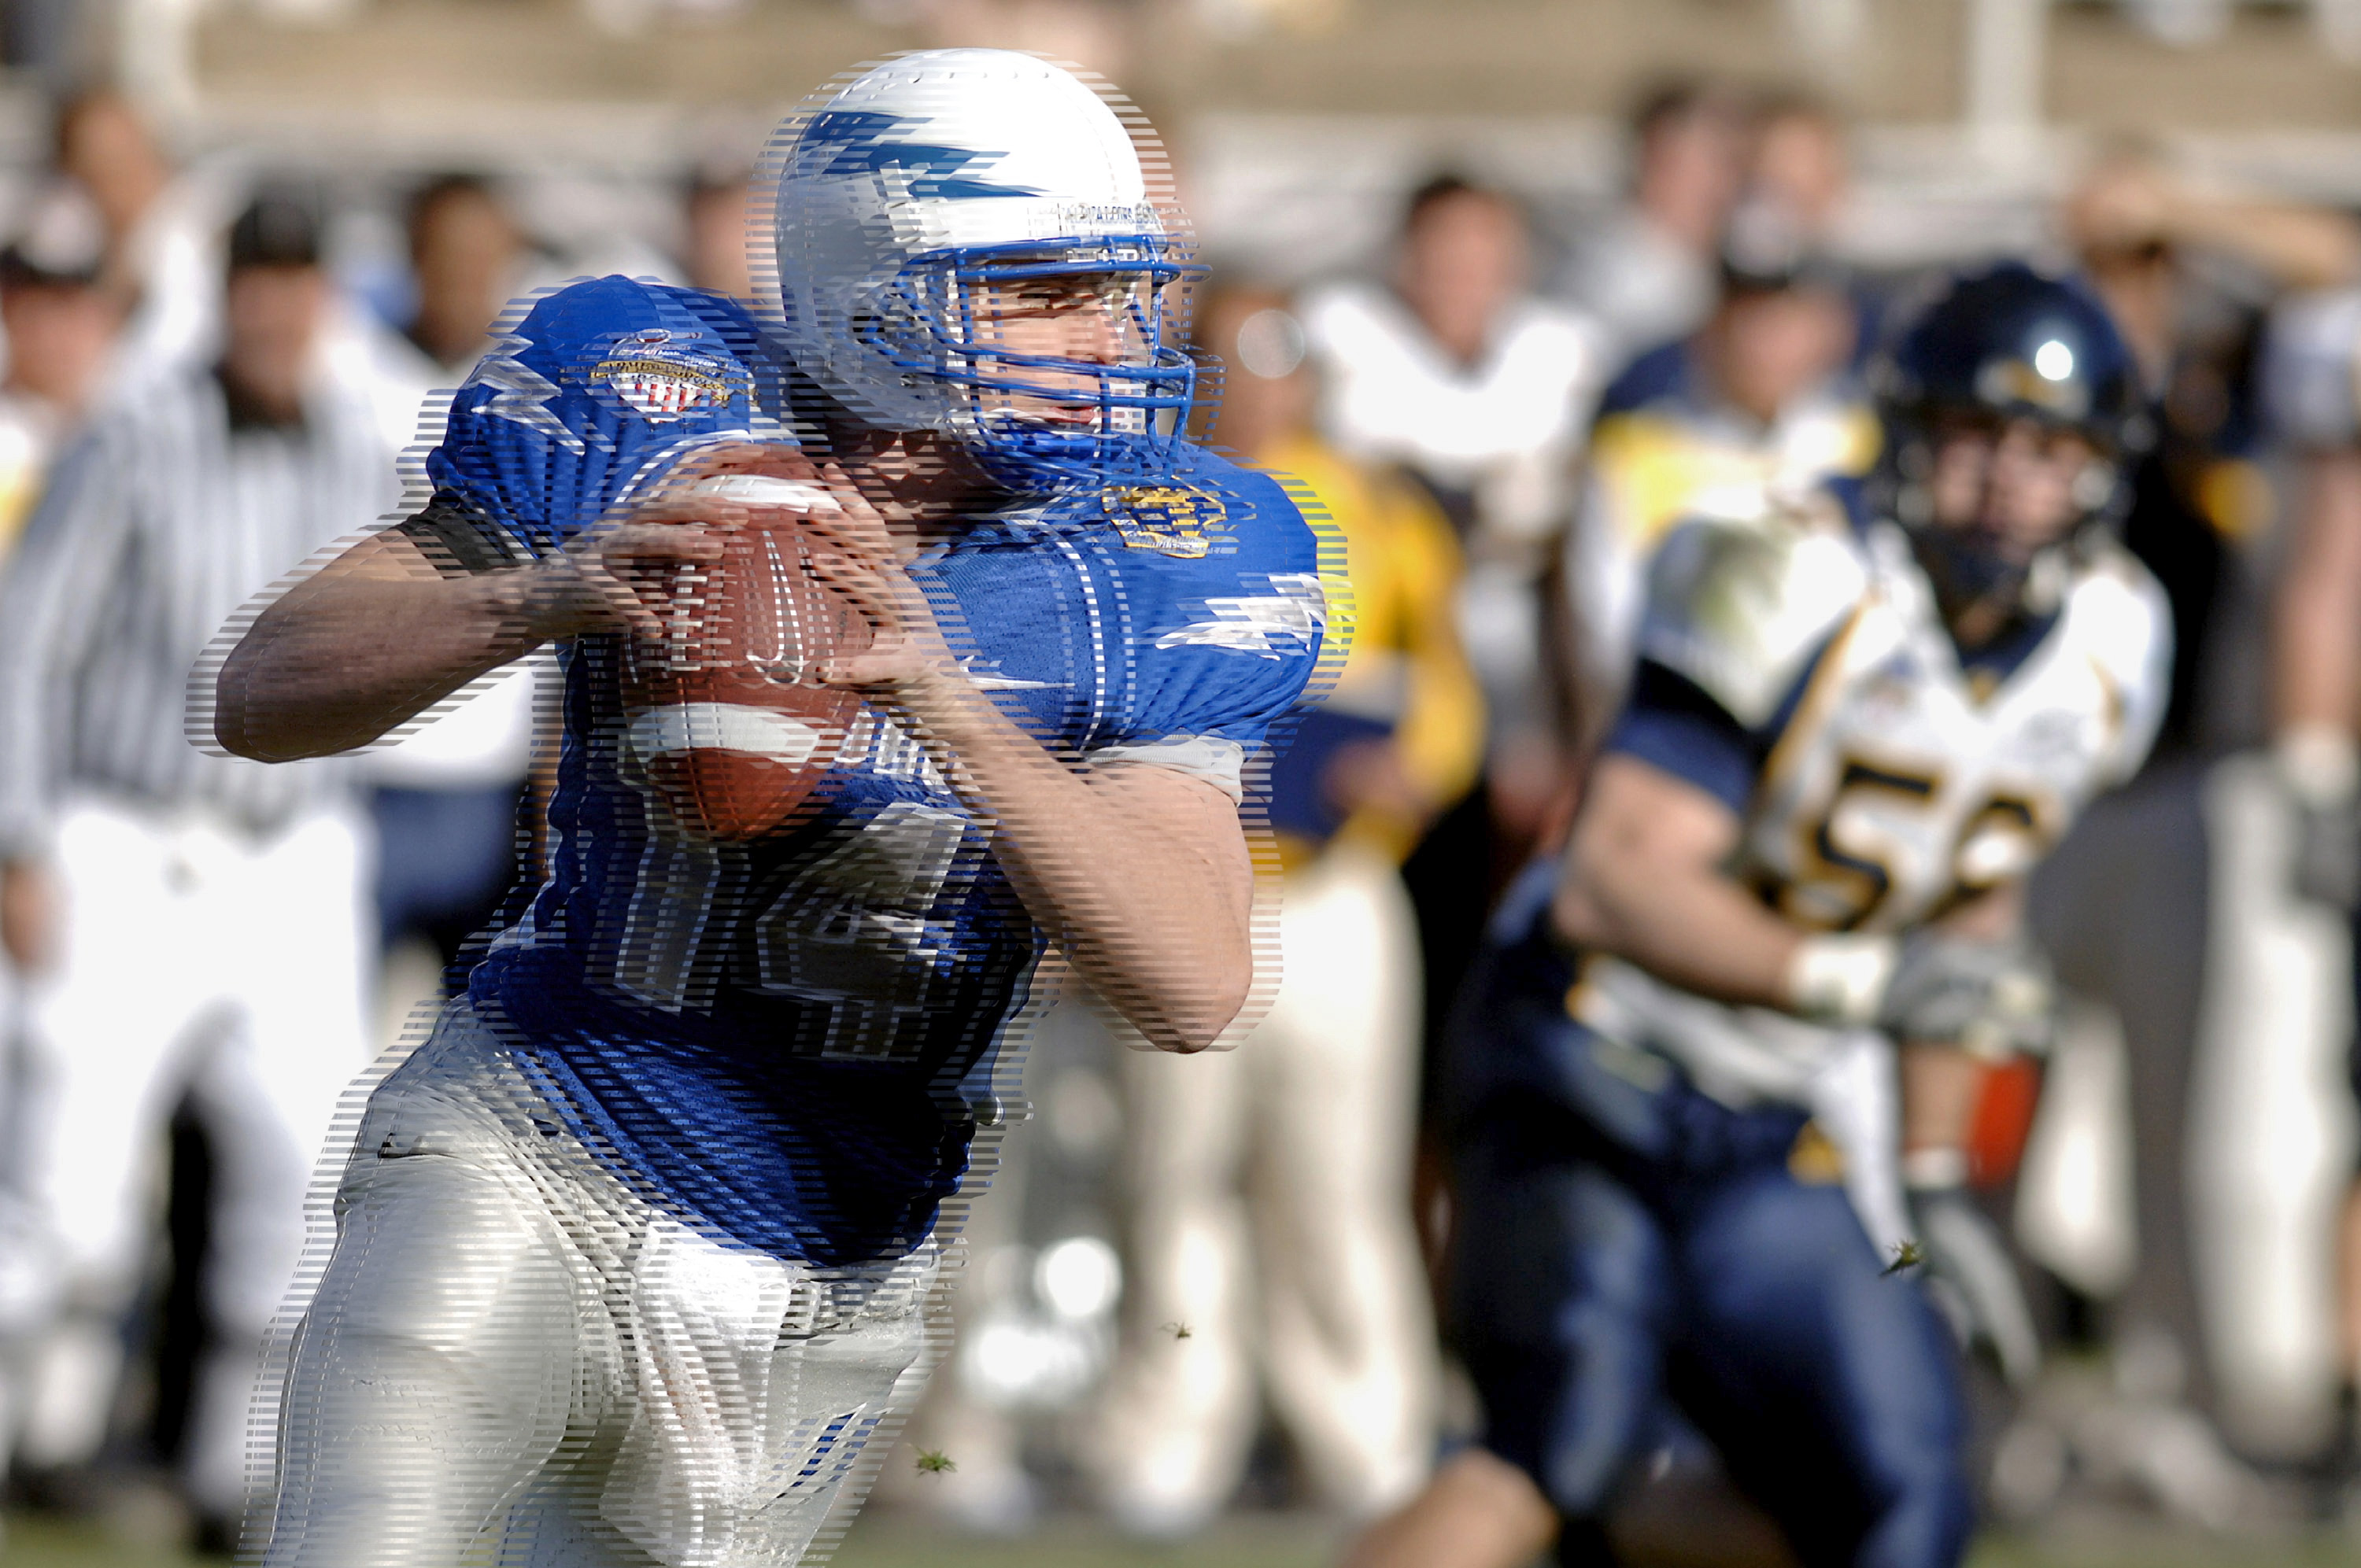
Converting the video involves combining the two fields, that were created as part of the interlacing process, into a single frame. By default, this process creates a rather ugly artifact on high motion in the video track. The motion between fields can cause visible tearing when displayed as progressive video. Essentially, the video track shows two different line fields where the fast motion is occurring, creating a staggered line appearance as seen in the image below on the figure to the left.

Left: Interlaced video shown in a progressive format. Right: Deinterlaced video (more on this later).
How to tell if your camera captures interlaced video
A lot of this article has talked about interlacing as a legacy component, but that doesn’t give a fair representation. A lot of analogue cameras, for example, are setup to deliver video in an interlaced manner. Even some modern digital cameras still offer interlaced mode. Reasoning behind this is partially for compatibility and also 1080, even 1080i, is a strong selling point and it’s cheaper to do 1080i. Because of that, even though interlacing might be sometimes associated with older, televised broadcasts, it’s still very possible to use an analogue camera with a capture card or another setup and still run into interlacing.
One method to tell if your camera was setup for interlaced content or not is in the specs. While some will be overt, describing that the camera outputs in interlaced mode, others will state it in their mentioned resolution. For example, we already discussed that 1080p is an HD feed that is progressive. If that stated 1080i, though, it would mean it’s HD, interlaced content. Chances are good that someone has seen 1080p content much more frequently than the interlaced version. Most modern analogue cameras, if they are interlaced, should mention it either directly or with the resolution. If it’s an older analogue camera, from before 2003, it outputs interlaced content as the first consumer-affordable progressive camera was the Panasonic AG-DVX100 that was released in 2002.
What is deinterlacing video: when you have to use interlaced sources
Thankfully, there is a process called deinterlacing which can solve issues created from presenting interlaced content in a progressive medium. Deinterlacing uses every other line from one field and interpolates new in-between lines without tearing, applying an algorithm to minimize the resulting artifacts.
How to deinterlace video for live streaming
Deinterlacing is done at the encoder level for live content. How this is done varies from encoder to encoder, with some enabling it through a simple check box.
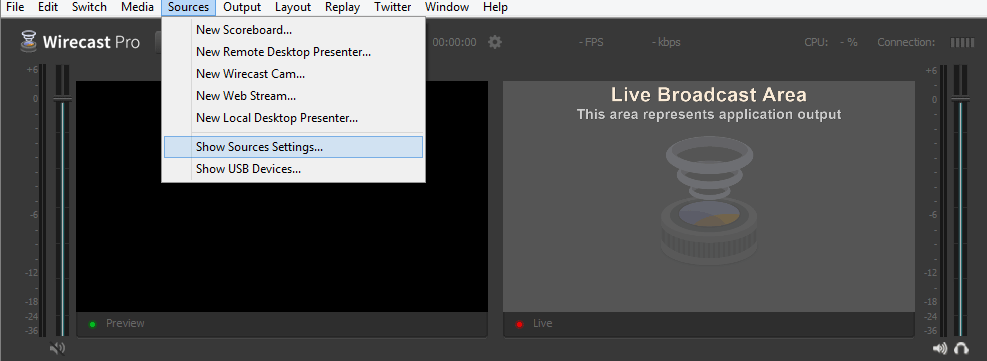 On Wirecast, this is found under Sources and then “Show Source Settings…”. From this screen you can select your source, with most having two options available. For example, a capture card source might show “Capture Device Size” and “Device Deinterlacing”. Changing this from “None” to “Blend” will activate deinterlacing.
If someone is using an older version of Wirecast, this option is instead located under File > Preferences > Advanced instead.
Teradek encoder products, such as the Cube and VidiU, offer built-in hardware based deinterlacing. Inside the interface for the encoder, this feature is found under Encoder Settings. Located above Adaptive Framerate, this feature is called simply Deinterlacer and can be enabled or disabled.
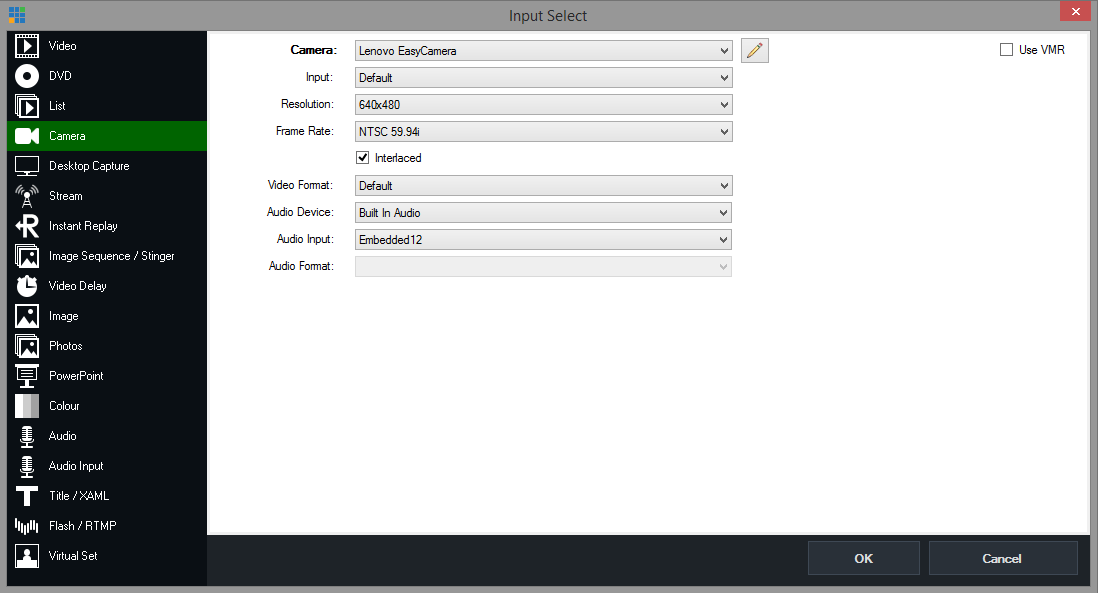 For vMix, the user has to click Add Input in the left corner to open the input selection panel. The options present will depend on the type of source selected. If selecting a source like a camera, an option called Interlaced should be present, located below Frame Rate. Unlike other encoders, to deinterlace content this option needs to be unchecked.
Adobe Flash Media Live Encoder (FMLE) users can find the deinterlace option on the main Encoding Options panel. Simply called “Deinterlace”, this feature is found to the left of Timecode at the bottom of the available options.
Another source of interlaced video: three-two pull down
Sometimes referred to as a 2:3 pulldown, three-two pull down is a process used to convert material from film to an interlaced NTSC display rate. This involves taking content created at 24 frames per second and converting it to 29.97 frames per second, which is the signal frame rate of NTSC video. This process involves duplicating fields, two from one frame and then three from the next frame or the process can also be vice-a-versa. Consequently, it’s common for this to be called 3:2 pulldown or 2:3 pulldown as well, with the numbers used interchangeably to describe the effect.
Reverse telecine: removing the 3:2 pull down
Also known as inverse telecine (IVTC), reverse telecine is a process that can be used to remove the effects of taking a source and stretching it from 24 frames per second to 29.97 frames per second. This involves removing the added information from the frames to return it to the 24 frames per second.
For example, frame 1 might be converted into frame 1A and frame 1B through interlacing, with each being a vertical odd or even sequence that is interlaced. However, frame 2 might be converted into frame 2A, frame 2B and frame 2C, with the last one being duplicated content that is used to gradually increase the frame rate. As part of reverse telecine, this added content would be removed to restore the video to its original frame rate.
If you want to live broadcast content that previously had a 3:2 pull down applied to it, it’s recommended to encode it with a reverse telecine process ahead of time before the broadcast. Apple Compressor and Handbrake, the latter calls this process “detelecine”, are two examples of programs that can be used to achieve this.
Can deinterlacing video be bad?
Yes, if the source is not interlaced than the result can introduce needless artifacting if the deinterlacing methods are inadequate. This will be most noticeable on motion, which will have a greater loss of quality. Fine, rounded details can also suffer, often converting a smooth look into a blocky look, like mini stairs as would be common in video games with pixels present and trying to create curves. If the type of deinterlacing being provided is blended, it can show obvious motion in the same frame.
In addition, deinterlacing is more CPU intensive. So an encoder using deinterlacing will require to be on a better unit compared to a similar encoder not using deinterlacing. So from a reliability standpoint, it’s better to not use the feature too.
So if a source is not interlaced, do not provide deinterlacing to it. If someone isn’t sure if a source is interlaced or not, do a quick test broadcast without deinterlacing. After some sort of motion occurs in the feed it should be easy to tell if the source needs to be deinterlaced or not.
If someone is dealing with mixed content, where part of the video is interlaced and other elements are not, it’s up for debate if the entire feed should be deinterlaced or not. Interlaced content displayed in a progressive manner is much more disruptive to the viewing experience compared to artifacts introduced from inadequate deinterlacing on already progressive content. For this reason, I personally recommend to deinterlace when dealing with mixed content. School of thought there can go both ways, though. For example, if the amount of interlaced content is minimal, like briefly showing an older TV playing interlaced content, a broadcaster can get away without using it.
Summary: know interlacing and how to correct it
Many modern broadcasters will never experience interlaced content when it comes to their own broadcasting. For example, someone using just a webcam and a software based encoder will never have to worry about this. As setups become more complex, bringing in either professional analogue cameras or legacy equipment/sources (VHS tapes, etc), interlacing might come up and it’s best to know the quick techniques that can be used by your encoder to prevent it.
If you feel comfortable with the concept of deinterlacing, it might be time to get familiar with a streaming platform. Here is an archived Demo of the IBM Video Streaming solution.